Instagram Video Contest App for Facebook Pages from TabSite
NOTE: 6/2016 - Due to changes by Instagram this Instagram Contest app has been forced to be discontinued.
Video Contest (User Entries or Page Admin Entries)
Create Viral Video Contests where visitors can share their video entry for your fans to vote on! Multiple options are available including options to limit votes to one time, once daily or setting a specific number of times a user can vote per contest. Select this option to begin creating a video entry contest. YouTube and Vimeo videos are supported.
The Instagram Video Contest App is designed to help social marketers empower their mobile toting fans to participate in Instagram Video Contests hosted on their Facebook Page.
With the marriage (acquisition) of Instagram by Facebook, the Instagram mobile app has gained new clout and status as a social sharing tool. The fact that it integrates easy cross posting of Instagram videos to Facebook, Twitter, and Tumblr certainly only helps as well!
Now Facebook marketers can capitalize on this fast growing social media tool by hosting Instagram Video Contests on their Facebook Pages!
The Platinum Plan App allows Page Admins to setup a custom tab on their Facebook Page to host the Instagram contest. Visitors will enter the video contest by submitting a video to Instagram with the designated hashtag in the video description. The Facebook Page Admin sets this hashtag during setup.
The TabSite Instagram App will pull in all videos for the hashtag from Instagram within the date range specified in the contest settings and visitors can then vote for their favorite entry. Perfect for the mobile savvy social community, this app enables Facebook Pages to capitalize on the use of Instagram and the power of Facebook for this contest.
KEY FEATURES:
- Page Admin sets Instagram hashtag used for the entering the Contest
- Videos with the hashtag are included by a date range set by the Page Admin
- Like all TabSite apps, there is ability to customize to any language
- Admins have the option to pre-approve all entries before they are live on the Facebook Page contest tab if desired
- There is ability to setup a pre-contest countdown and post-contest display of winner(s)
- Ability to add a Like Gate on the tab to ensure a Like of the Page in order to be able to vote
- Social Sharing tools to enable entrants and voters to spread the message of their favorite entry to Facebook Twitter, Pinterest, and Google +
- Ability to view all voters and export contest vote data via csv file
- Smart URL to enable Facebook mobile users to view entries and vote
Each entry has a link to the Instagram user that submitted it. A winner would be contacted via Instagram.
INSTRUCTIONS:
In the Manager section and then click the Add App button.

Then, scroll down the page until you reach the Contest Apps. Search for the Instagram Video Contest App and click the Add+ button.

You will then be forwarded to the App Builder page. This section includes numerous sub-sections specifically Instagram Setup, Contest Setup, Display Options, Gallery View Setup, Rules, Privacy, Pre-Contest, Post-Contest, Comment System

In this page, you can upload all the images you would like to display in your photoshow. Be reminded that the recommended image size is 810 x 75 pixels in any of the following format: jpg, png or gif.

Using Hashtags and Pre-approval setup helps you be in control of the contest entries. You can also set email alerts to alert you whenever a video matches your contest category.

You may choose what kind of media is acceptable for your contest. And an option to allow tagging in commentds section.

Setup Time Zone for your contest as much as the Start and End Date and Time of your contest. You may also detail the allowable number of times that a user can vote per contest.


Display Options for your gallery can be set dependng on how you want your entries to appear and function. There is also an image size of 810 by 180 pixels. Please take note.


Display your Contest Rules, and put the URL where you will lead the viewer to the Rules Page


In terms of the Pre-Contest sub-setting, just modify the texts in the Text area.

For the Image tab, simply upload an 810 x 300 pixel image

Modify the labels you would like to utilize for your Countdown.


In relation to the Post-Contest sub-setting, just modify the default information in the Text area.

Modify the Contest Winner text as well as the quantity of winners you want to reveal. This is helpful if you aim to feature numerous winners. They will exhibit from left to right in sequence of most votes.

You can edit and put your own version text to caption the viewing of submitted entries

You have an option to enable or disable commenting features

Publish your tab to Facebook with the help of the Facebook Settings. It requires you to specify your fan page, name of your tab, logo (the recommended size is 111px by 74px) and an icon for your tab.
In the lower-right corner of the page is the "Create your own application". It exactly does what its name states and when you're already done doing your application, it requires you to enter your APP ID and App Secret to the blank fields beside these variables.

The Promotion Tools has four sub-settings: Social Sharing Options, Blog/Web Call-out Tool, Post Planning

Set the Social Sharing buttons for other social networks you want on the tab. We recommend having them all to increase ease of sharing the contest! Customize the title and message in Facebook and Google + shares, and populate a recommended tweet. This is all more opportunity to brand your company, so, try to be strategic in your title and description as well as the share image.

Generate added traffic by creating a promotional call-out using the Blog/Web Call-out Tool. All you have to do is upload a photo and it will then provide you an embed code. This code can be placed to your blog or website which, in turn, creates a call-out image. When this image is clicked by visitors, they will be directed to your tab on Facebook.

Want to schedule your posts to social networks and publish it at the same time? The Post Planning setting can do this job. There are three scheduling services provided by the page, these are Hootsuite, Sendible and Buffer. However, before you click one of them, see to it that you save your page first. The generated URL for posting is in the form of a SMART URL since it is PC and mobile friendly. Online visitors will be forwarded to your created Facebook tab.

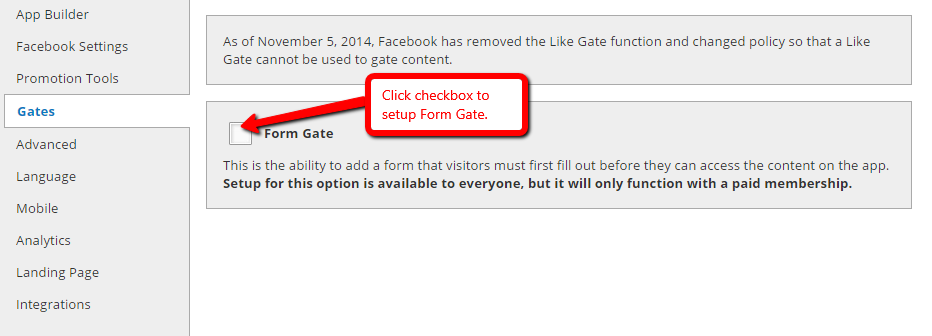
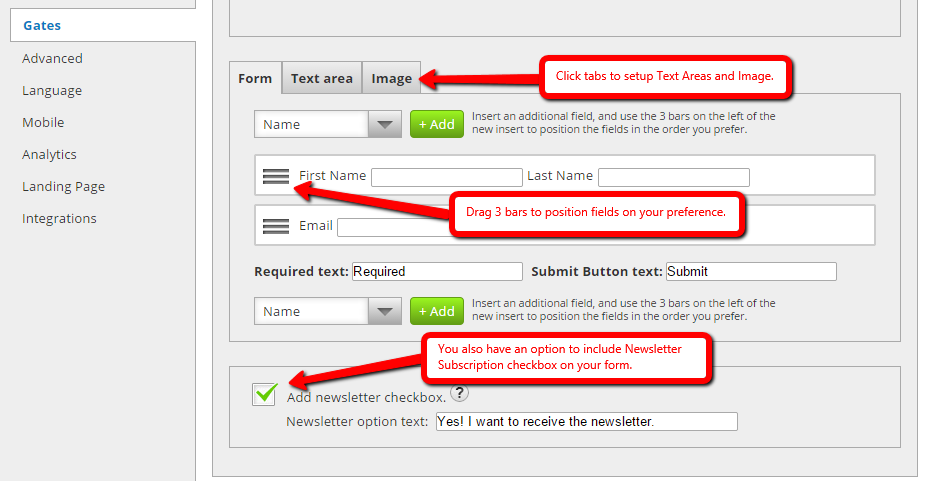
Form Gate is a simple form that users must complete and submit in order to access your app content.

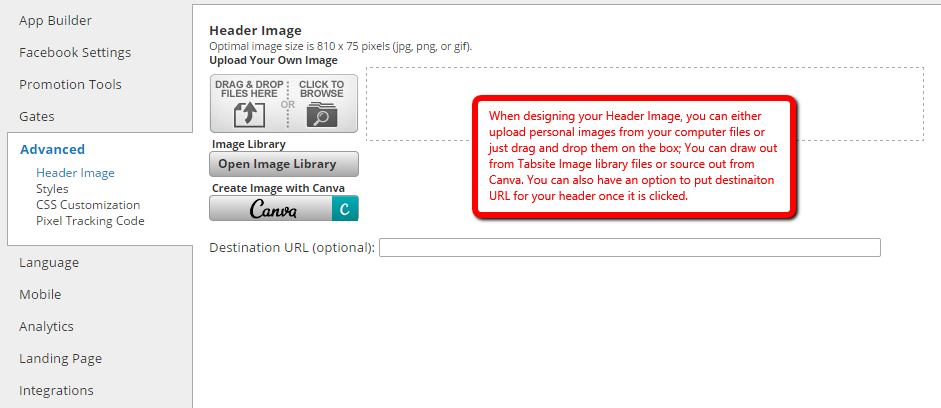
Advanced Setting. You can upload an 810 x 75 pixels header image for your app in this section. Your link color, text color and background color can also be customized in this section. Lastly, the setting has already provided the default styles for customizing the CSS associated with your app.


Another feature to help you with marketing is to implement remarketing pixels! We have a Pixel Tracking code area for Facebook and/ or Google Ads. By installing the pixel code from those services, you are then able to target visitors to your promotion back on that service with ads. Simply paste the pixel tracking code that they provide.

The Language settings encompass three sections specifically Instagram Contest, General, and the Comment System.

The Instagram Contest sub-setting of the Language section has the Language Settings to customize the default input information written on the fields of the variables.

The General sub-setting is composed of two drop-down menus namely "Like button language" and "Tweet button language" which contains a large selection of languages. You can choose your desired language to show in your app's Like and Tweet buttons. When it comes to your Share button, simply customize the default text in the field beside it.

The Comment System sub-setting of the Language section has 2 parts; the Language Settings and Errors. Customize the default input information written on the fields of the variables.


The Mobile section has two Global Options: "Render desktop version on mobile" and "Use like gate on mobile devices". The first option lets mobile users gain access the app's content in a mobile-friendly alternate version while the second option displays the similar information in the form of a Like Gate image on mobile devices: A piece of reminder: Not all apps work with Mobile Difference.

The Analytics page is the last one in the settings list. It has graphs representing the different traffic sources such as Overview, Facebook Views, Web Views, Mobile Views, Microsite Views, Shares, Likes, Entries, Votes, Export Entries, Export Votes.

Overview graph

Here, you can see the type of graphs on the sections of Facebook Views, Web Views, Mobile Views and Microsite Views

This is how you'll view the amount of Shares, Likes, Entries, Votes, Export Entries and Export Votes of your app.


Landing Pages are a powerful feature allowing you to create lead capture pages using any app.
Create your own landing page directory name for your use on any landing pages. You create a name specific to your business such as https://tabsite.com/mybusiness/summerpromo(where "mybusiness" is your business name and the landing page is "summerpromo".)
Landing pages are the perfect area to drive traffic to in order to create more leads. Any app can have a Landing Page.
You may also change the title and header font color.

Integrations:
The "Integrations" area offers options for connecting forms to other services like Mailchimp, Infusionsoft, AWeber and Sendy.
See full details on the Mailchimp integrations here with steps for setup so that your form data is automatically added to your service provider.
See full details on the Infusionsoft integrations here
See full details on the AWeber integrations here

We give you the option to place the Pixel Tracking code for Facebook Ad's and/or Google Ad's on your landing page. This allows you to retarget/remarket to visitors via ads on those services.
In addition, we also offer CSS control for advanced styling of your Landing page as well to use if desired.

The moment you have finished editing all the settings for your Instagram Video Contest App, just click the green "Save" button.

After clicking the green button, you will then be forwarded to the My Apps page. This is the area where you'll see all the apps you created. In here, you can create another app, test it and finally, publish it in accordance with the features of your Plan.
